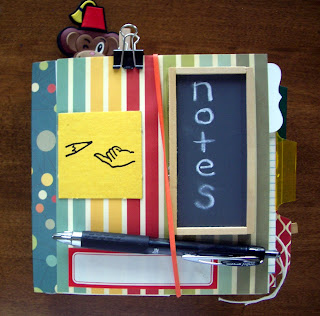
I LOVE Mini Books! I wanted to make one I could use often and I picked up this 6X6 Cosmo Cricket "The Boyfriend" stack on clearance for $2.50! You'll remember from a few posts back, the 6 1/2 X 9 1/2" box of envelopes I got at the thrift store... so I decided to try to use them as my base. I folded a 1/2" up and 3 1/2" over.
I attached these together on 3 sides, forming a small pocket and a large pocket. The covers are 2 pages of the $1.00 mini books they used to sell at Micheal's. Covered all with the patterned paper and added tabs, index cards, paper pads, flash cards, vintage school book cutouts and clips. I am VERY happy with it!!
A New Journal
I am completely HOOKED on my new re-purposed hardcover book Journals... so I made another one! Used some paint and metallic gold paint and my homemade stamps to decorate the covers. Here's some recently completed pages:
A friend Judi and I have been experimenting with layers of paint and masking tape. Painter's tape seems to work best so far :)
Thanks to everyone for your lovely comments!!
Friday, July 29, 2011
Monday, July 18, 2011
New Journal Pages
Just some random journal pages I've completed lately.
The checkerboard design is a foam stamp I made. Red and black is oil pastels, something I love but don't use enough.
An experiment using primary colors red, blue and yellow. The candy box is a tip in with journaling on 1 side and a tribute to my friend Joyce R. She has taught me to look for inspiration in EVERYTHING!!
I think this is my favorite journal page ever. It's just ME!
I used Leslie's ghost writing technique of journaling with sharpies and covering with gesso. Video Tutorial Some of the writing bleeds thru but not enough to read it. The big poppy is a new rubber stamp I just got and LOVE.
Friday, July 15, 2011
Dollar Store and Thrift Mini Haul
Went scouting for supplies at the Dollar Store and found a couple of goodies.
I'm THRILLED with this sink drainer thing-rigid plastic and PERFECT as a stencil!
Got this non-sparkly Black eyeshadow to use for shading in my journal and it works GREAT!
Loved the texture of this rug mat. I cut it into circles and squares to spray through.
And just a crochet doily to spray through also.
They are 6 1/2" X 9 1/2". Think I'll try to make a 6x6 junk journal from them.
I'm THRILLED with this sink drainer thing-rigid plastic and PERFECT as a stencil!
Got this non-sparkly Black eyeshadow to use for shading in my journal and it works GREAT!
Loved the texture of this rug mat. I cut it into circles and squares to spray through.
And just a crochet doily to spray through also.
THRIFT STORE
Some Flash cards-LOVE the Shadow Alphabet stencil-a Carved wood frame for 75 cents and a Box of white envelopes.They are 6 1/2" X 9 1/2". Think I'll try to make a 6x6 junk journal from them.
Tuesday, July 12, 2011
Re-Capturing Your Muse
Let's face it...we ALL have days where we just feel Un-inspired. Here's a fun idea I like to use:
1. Grab a Large Print book (50 cents at Thrift store), Index cards and a glue stick.
2. Scan pages for Random phrases...I pick ones that make me feel something or give me a visual picture in my mind. Cut them out.
3. After you have 10 or 20 cut out, spread them out and see which ones go together. Glue on index card or set aside for a greeting card.
4. I am going to keep them in my NIFTY new holder, but a index card box would work just as well.
5. Grab one that speaks to you and use it as a jumping off place in your journal or card making. Be as literal as YOU want. You can actually use them or save your used ones and swap a stack with a friend.
Thursday, July 7, 2011
Mini Thrift Haul and New Watercolors
Thanks to the UBER creative Dale Anne (Her link) I'm addicted to Thrift Shopping for artsy supplies. A small but GOOD haul this time.
Ignore the watercolor set for now-NOT from thrift store :)
I was THRILLED to find the designer Push Molds. Found some instant Paper-Mache in Mom's stuff and wanted to try making embellishments with it. Figure they'll be nice and light weight.
The EK Success punch for $2.99 was a steal! May save that for a giveaway.
BEST for last... a 1950's children's LOTTO set with AMAZING graphics!
Small square cardboard pieces AND....
KILLER playing boards in nice sturdy cardboard that will make the BEST Mini-book covers! Will HAVE to save a couple of these for the giveaway, too.
NEW WATERCOLOR SET
My palette of tube watercolors is almost gone and have been looking around for a little portable set. I use an inexpensive PRANG set for book pages and large areas but wanted a "better" set for cardmaking. (I like to paint in rubber stamped images and use washes for backgrounds) The main difference being the translucency. I went to Hobby Lobby-coupon in hand- for the KOI 24 color Set with a waterbrush. I didn't like the colors at all. In fact they were kinda weird. So I checked out this WINDSOR NEWTON-Cotman-Student grade set and liked the colors better. Basically the same price.I'll let ya know how I like it.
Wednesday, July 6, 2011
Intentional Color
I am a Color JUNKY. I love to play with color and surround myself with color. For the most part in my creative endeavors, I just play and create with what ever color is close at hand... whatever I'm in the mood for. But other times I like to create with specific colors.
Somewhere along the line I had the power of color shown to me in a very simple way. Van Gogh's SUNFLOWERS. Link
I was told to cover up the blue line of the table's edge and watch how the vibrancy of the painting disappeared. I was amazed. It was further explained that orange and blue were complimentary colors (directly across from each other on the Color Wheel). From that point on I sometimes play with color INTENTIONALLY, when I'm in the mood. I say when I'm in the mood because I believe STRONGLY in spontaneity in my creative endeavors. But I do like to experiment and learn new things.
I'll be posting some of my experiments and would love to see your experiments,if you'd like to play along.
Monday, July 4, 2011
Artist Trading Cards- ATCs
Artist Trading cards are like little works of art 2 1/2" X 3 1/2". Traditionally they were used by artists as sort of a business card from 1 artist to another. I like creating them because just like Art Journaling and Card Making...the possibilities are endless.
I make mine in series of 3- 1 for me, 1 for my son(an artist) and 1 to give away to another artist.
I also like to sign mine all the same on the back.
I keep mine in a 3 ring binder using clear sleeves designed for collector cards.
They are TONS of fun!
I make mine in series of 3- 1 for me, 1 for my son(an artist) and 1 to give away to another artist.
I also like to sign mine all the same on the back.
I keep mine in a 3 ring binder using clear sleeves designed for collector cards.
They are TONS of fun!
Saturday, July 2, 2011
Thrift Store HAUL - Ideas needed!
I just couldn't resist this roll of wallpaper...I LOVE the painter-ly floral print! Of course it is WAY more than I'll ever use so it will no doubt show up in RAKs to my friends :) Afterall it was only $1.00 !
Next I found these 2 old books...1 on Graphic Design with cool fonts...
and a Geometry text book. I'm CRAZY for using geometry diagrams for backgrounds in my journal.
And I saved the BEST for last...a Vintage photo holder in PRISTINE condition...and here's where I need HELP.
The interior plastic sleeves hold roughly 3x5 size....so I was thinking of making it a color/idea file. ALL suggestions welcome...what would you do?? AND I sort of like the existing Vintage feel of the exterior..should I leave as is or embellish???
Corrugate and Duck Tape Journal
This is one of my FAVORITE ways to make a quick journal. I saw it a year or so ago on a video featuring the Fabulous Traci Bautista Video
1. Cut 2 pieces of corrugate (cardboard) to desired size.
2. Collage, paint, etc. corrugate covers...both sides if you like.
3. Affix duck tape to covers making sure they are even AND leave a space between the 2. The space between the 2 covers will determine the amount of papers you can add to your journal without it popping open.
4.Cut or tear a variety of papers roughly the size of the 2 pieces plus the tape.( The entire journal)
5.Using a hole punch or awl, punch holes thru the duck tape"binding".
6. Lay all papers evenly together, crease in center, punch holes in crease the same place as holes in duck tape.
7. Lay papers on inside of covers, matching holes,thread a ribbon/string/twine thru holes from the inside to outside. Tie on outside.
Post a link in the comments-would LOVE to see your version!
Subscribe to:
Posts (Atom)